Transforming Technologies Dual Footwear/Wrist Strap Tester Model GTS900K User's Manual
Ohm Metrics
Dual Footwear/Wrist Strap Tester Model GTS900K

Instruction Manual
Contents
Description
| GTS 900 | 1 |
| Features | 1 |
Installation
| Battery Installation | 2 |
| Free Standing Assembly | 4 |
| Height Adjustment | 5 |
| Wall Mount | 5 |
Testing
| Wrist Strap | 6 |
| Footwear | 6 |
| Specifications | 8 |
| Parts Included List | 8 |
| Service and Warranty | 9 |
Description
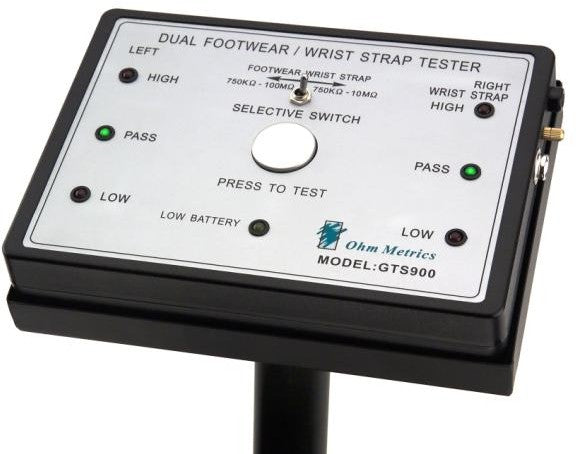
Ohm Metrics Duel Footwear/Wrist Strap Tester: Model GTS 900
The GTS 900 combo tester is a three-state touch tester designed for fast and accurate testing of ESD ground de- vices. The GTS 900 incorporates a unique dual test cir- cuit which eliminates the need for separate wrist-strap and foot grounder testers which saves money and space. This tester fully supports the “Compliance Verification Plan” requirements as stated in the ANSI ESD S20.20.
Reliable, Repeatable Results
Accuracy and reliability are key strengths of the GTS 900. Test parameters are standard but can be adjusted to match your own specifications. Wrist-strap testing is set with the ideal 750 kilohm-10 megohm circuit and a 750 kilogm-100 megohm circuit for accurate testing of foot grounders. False alarms disappear and adjustments are not necessary.
Features include:
- Combination Wrist Strap/footwear testing
- Wrist Strap Range 750 kilohm –10 megohm
- Footwear Range 750 kilohm - 100 megohm
- Low and High failure alarm modes
- Split footplate design
Battery Installation
The GTS 900 monitor requires 1(one) 9volt battery. The bat- tery housing is found on the back of unit. Slide battery cover off and insert only a 9volt battery.
- Only new and valid batteries can be
- AC adapter available
Assembly
The GTS 900 has two options for installation: Free-standing installation with footplate and pedestal or wall mounting. The most common is the free standing option.
Free Standing Installation
- Remove all items from carton and confirm you have re-ceived all items contained in the “Parts Included List.”
- Choose a location in the work area that is easily accessi- ble and safe for both test equipment and
Pedestal Assembly
- Locate the pedestal and the connection wire with banana clips on one end and eye blots on the
- String the connection wire through the pedestal so that the banana clips extend out the top of the pedestal and the eye bolts end extend out of the two holes at the bot- tom of the pedestal.
 |
 |
Pedestal and platform assembly
- Locate the platform and unscrew and remove the four (4) screws located on the underside of the platform.
- 2. Unscrew the height adjustment knob and remove.
- Slide the platform over pedestal taking special care to leave 12” of connection wire extending from the bot-tom.
- String one line of connection wire along wire grove in the platform and connect the eye bolt to connection point with a nut.
- 6. Repeat with remaining line of connection wire.
- Line up the base of the pedestal with the depression in the platform and return the screws.
 |
 |
Monitor Receptacle Assembly
- 1. Remove the two(2) screws from the top of pedestal.
- Mount the monitor receptacle on pedestal with the banana plugs extending through the receptacle See figure 1.
- 3. Return screws to securely fasten receptacle to pedestal.
- 4. Plug the banana plugs into the corresponding jacks on the back of the monitor.
- Carefully insert monitor into receptacle.
|
Figure 1 |
Banana Jacks |
|


Height adjustment
The GTS 900 monitor can be raised or lowered by adjust- ing the length of the pedestal.
- To do so, unscrew the height adjustment knob until the top portion of the pedestal is free moving.
- 2. Choose desired height of the monitor and tighten height adjustment knob.
Wall Mount
The GTS 900 can be mounted on to any flat, stationary surface. Frequently, the unit is mounted on a table or wall
- Attach two (2) mounting clips to the back of unit .
- Install two(2) screws 1 1/2” apart, leaving 1/4” of screw head from mounting surface.
- 3. Mount the tester on the screws, pulling gently down to lock into place.
- Place Footwear platform tester under the mounted unit and connect the eye blots of the connection wire to the footplate and insert banana plugs in to jacks on the back of monitor.
 Monitor with Mounting Brackets |
 Mounting Screw |
Testing
The GTS900 safely tests footwear and wrist straps for proper ESD protection.
Wrist Strap Testing
- While wearing wrist strap, plug banana plug end of cord in the jack labeled “RIGHT WRIST STRAP”
- Turn the selective switch located in the top center of the monitor to the right labeled “WRIST STRAP”.
- Press the test button and hold for 2-3
- The green LED labeled “PASS” indicates that the wrist strap and cord are functioning properly.
- If either the red LED “LOW” or the red LED “HIGH” light and audible alarm sound, then check the wrist strap and cord set immediately.
Footwear Testing
For the following testing, one must be wearing foot ground- ing ESD protection. The GTS 900’s dual footwear sensors allows for testing of each foot independently. The left foot ESD protection is indicated with the LED lights on the left side and the right foot is indicated on the right side of the monitor.
- Turn the selective switch located in the top center of the monitor to left labeled “FOOTWEAR”
- Place feet onto silver sensors of platform.
- Press the test button and hold for 2-3 seconds
NOTE: Testing of footwear on both feet happen simultane- ously.
- The green LED located on the LEFT side of monitor la- beled “PASS” indicates that the LEFT foot ground is func- tioning properly.
- The green LED located on the RIGHT side of monitor la- beled “PASS” indicates that the RIGHT foot ground is functioning properly.
- If either the red LED “LOW” or the red LED “HIGH” light on the LEFT side of monitor and audible alarm sound, then check the LEFT foot ground set immediately.
- If either the red LED “LOW” or the red LED “HIGH” light on the RIGHT side of monitor and audible alarm sound, then check the RIGHT foot ground set immediately.

Product Specifications
General
| Power | 9v Battery or AC adapter |
| Operation | Resistance Bridge |
| Output | Six LED indicators and audio signal |
| Accuracy | +15% for wrist strap tester +15% for anti-static footwear tester |
GST900
| Weight | 0.44lbs |
| Dimensions | 5.5” × 3.1” ×1.5” |
Testing Range and Indication
| INDICATION | FOOT WEAR | WRIST STRAP | ALARM |
| HIGH | R>100MΩ | R.>10MΩ | YES |
| PASS | R≥750KΩ R≤100MΩ | R≥750KΩ R≤10MΩ |
No |
| LOW | R<750KΩ | R<750KΩ | YES |
| LOW BATTERY | Voltage<7V,change battery |
Parts Included List
GTS900
- GTS 900 tester
- Foot plate
- AC adapter
- 2 piece pedestal
- Connection cord for Foot plate
Service and Warranty
Transforming Technologies, LLC provides a limited warranty for the Model GTS 900. All new products are guaranteed to be free from defects in material and work- manship for a period of one (1) year from the date of shipment. Liability is limited to servicing (after evaluat- ing, repairing or replacing) any product returned to Transforming Technologies. The company does not war- rant damage due to misuse, neglect, alteration or acci- dent. In no event shall Transforming Technologies be li- able for collateral or consequential damages.
To receive service under warranty, please contact Transforming Technologies Technical Support.